Mostrando entradas con la etiqueta repair. Mostrar todas las entradas

lunes, 18 de febrero de 2013

REPARACIÓN NIKON F100 REPAIR


REPAIR NIKON F100

REPARACIÓN NIKON F100


Me entregan dos cuerpos Nikon F100.
Uno de ellos no tiene las cortinillas del obturador. Se habían destrozado. Le falta la tapa trasera pero funciona todo correctamente.

El otro cuerpo funciona casi todo perfectamente. Falla el sistema de gestión del diafragma sobre objetivos de la serie G de Nikon. Está completa aunque tiene la goma del grip partida y pegada con una cinta adhesiva.

I delivered two bodies Nikon F100.

One of them does not have the shutter curtains. It had destroyed. Lacks back cover but everything works properly.

The other body functions almost everything perfectly. Fault management system aperture on G series lenses from Nikon. It is complete but has the starting rubber grip and stuck with tape.


La propuesta consiste en usar la parte electrónica de la que no tiene bien el obturador y ponérselo a la F100 que si está completa.


Se procede a retirar la tapa trasera y proteger las cortinillas del obturador.

The proposal is to use the electronic part that does not have either the plug and put it to the F100 that it is complete.

We proceed to remove the back cover and protect the shutter curtains.


A continuación quitamos las gomas de la parte delantera.


Then remove the front rubber.


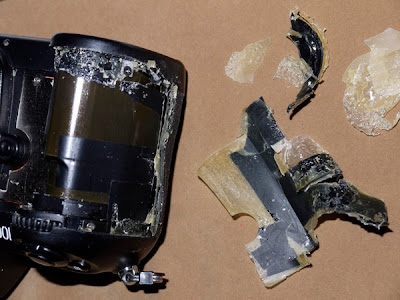
Al retirar la goma del grip, nos encontramos con un implante de silicona. ¿Trataminto rejuvenecedor? ¿Parecerse a un modelo superior? ¿Coquetería?...

When removing the rubber grip, we find a silicone implant. Rejuvenating Treatment?? Look like top star model Coquetry?? ...


Retirando los tornillos adecuados se extrae la base del cuerpo. No es necesario quitar la goma de la base. Hay cuatro tornillos que rodean la rosca de sujeción a trípode. Estos no se tocan.

By removing the appropriate screws you remove the base of the body. No need to remove the rubber base. There are four screws surrounding the fastening thread a tripod. These are not touched.


 Quitamos la placa metálica del frontal que está junto al grip y retiramos los tornillos que sujetan el escudo de plástico con la bayoneta F. Para llevar a cabo este paso debemos despegar la tapa del mando de modo de enfoque (M, S, C) y retirar el tornillo que esconde debajo de la misma.

We removed the front metal plate next to the grip and removed the screws holding the plastic shield with bayonet F. To perform this step we must take off the lid of the control focus mode (M, S, C) and remove the screw hidden under it.


Se retiran todos los tornillos que sujetan la tapa superior del cuerpo (dos a los lados, dos al frente bajo el logo NIKON, dos en la parte posterior a los lados del ocular, uno bajo la tapa del botón de ajuste de dioptrías, uno a la derecha del punto de referencia de anclaje del objetivo, uno bajo la referencia F100 y por último uno dentro del compartimento de las pilas.
El botón de control de las dioptrías está atornillado con un tornillo muy pequeño que se esconde debajo del símbolo +-. Tu debes despegar ese pequeño disco de plástico con el símbolo usando la punta plana de un destornillador pequeño. Ese disco es una tapa para ocultar el tornillo. Mira bien la fotografía numero 9.


They remove all the screws holding the top cover of the body: one on each side, two at the front under the logo NIKON, two in the back to the sides of the eye, one under cover diopter adjustment knob, one to the right of the reference point of the target anchor, one under the reference F100 and finally one inside the battery compartment.
The diopter control button is screwed in with a very small screw that is hidden under the + - symbol. You must peel off that little plastic disc with the symbol using the flat tip of a small screwdriver. That disk is a cover to hide the screw. Take a good look at photograph number 9.


Procedemos a retirar con sumo cuidado la tapa superior levantándola por el lado izquierdo visto desde el frente. Hacerlo con mucha precaución para no romper la cinta FPC que une esa parte al cuerpo en el lado derecho.

We proceed to carefully remove the top cover by lifting the left side viewed from the front. Do it very carefully to avoid breaking the tape that part FPC linking the body on the right side.


Desenroscamos los dos tornillos que sujetan esa cinta FPC teniendo mucho cuidado en observar como están puestos y dónde se ubican las arandelas separadoras de material aislante para volver a ponerlas en su lugar de la misma manera que las encontramos.

Unscrew on the two screws holding the FPC tape being careful to observe how they are made ​​and where are located the insulating material spacer washers to put them back in place the same way we find them.


El siguiente paso consiste en localizar los tornillos que sujetan el bloque central del cuerpo donde se encuentran los siguientes dispositivos (entre otros): Obturador, motor AF, sistema de medición del AF, sistema de medición de abertura de diafragma y gestión de la misma en objetivos G.

Las imágenes que se muestran a continuación no tienen texto de apoyo.
Estas imágenes corresponden a la cámara donante.

 The next step is to locate the screws holding the center block of the body where the following (among others): Shutter, AF motor, AF measurement system, measurement system aperture diaphragm and managing it in lenses G.

The images shown below are not supporting text.

These images correspond to the body donor.


 Este último módulo central es el que tenía en su interior el cuerpo donante.

 The latter is the core module that was inside the body donor.


 Y estas dos imágenes finales muestran el módulo central que presentaba la avería.

A partir de aquí el proceso es inverso y se vuelve a poner todo en su sitio dándole, como era de esperar, el cambiazo al conjunto central de ambos cuerpos.

Espero que te haya gustado y si tienes algo que comentar hazlo y deja tu opinión.

And these two final images show the central module that had the failure.

From here the process is reversed and put back everything in place giving, as expected, the change had the core set of both bodies.

I hope you enjoyed it and if you have something to say do it and leave your opinion.


sábado, 22 de diciembre de 2012

Canon G7 con dial zoom averiado y motas en sensor

CANON G7 CON EL MANDO DEL ZOOM AVERIADO Y EL SENSOR SUCIO.

CANON G7 WITH ZOOM FAULTY AND DIRTY SENSOR.

A la cámara no le funcionaba el mando del zoom y en el sensor hay manchas de polvo.

El mando del zoom bailaba de un lado a otro sin resistencia y no actuaba sobre el objetivo.

A camera did not work the zoom lever and the sensor are dust spots.

The zoom lever danced from one side to another without resistance and not act on the target.


Sacamos los tornillos que sujetan la carcasa y el aro del frontal que rodea el objetivo.
Se separan con cuidado las dos mitades de la carcasa.

We take out the screws holding the housing and front rim surrounding the target.

Gently separate the two halves of the housing.


Hay que tener cuidado de no mezclar los tornillos ni perderlos.

Be careful not to mix the screws do not lose them.


Ya está lista para que empecemos a retirar las partes importantes en esta reparación.

It's ready for us to begin to withdraw the important parts in this repair.


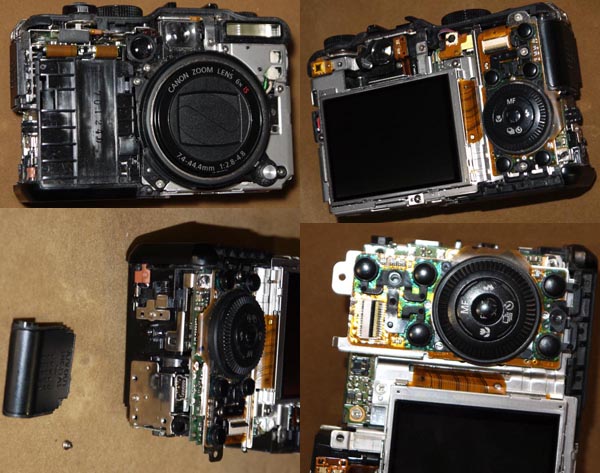
Desmontamos la parte superior para acceder al dial de zoom.

 Dismantle the top to access the zoom dial.


Vamos a retirar esa plaquita de circuitería porque debajo se ubica el mecanismo del dial de zoom.

 We will remove the wafer circuitry because underneath lies the zoom dial mechanism.


 Al darle la vuelta a ese circuito vemos que el resorte del dial está roto. Falta la mitad del muelle. Como es una pieza dificil de localizar, confeccionamos una a partir del muelle de un portabaterías estropeado.
 
We turn to the circuit we see that the dial spring is broken. Missing half of the spring. As it is a difficult piece to find, we made one spring from a broken battery holder.


Ya tenemos la pieza y ahora volvemos a montar ese conjunto para continuar con la parte del sensor.
Probamos el primer ejemplar y vemos que funciona bien.

 We already have the part and remount now set to continue this part of the sensor.
Tried the first issue and see that it works well.


Ahora desmontamos la parte trasera donde están los mandos.

Now dismantle the rear where the controls.


Con cuidado de no romper la cinta flexible.

 Careful not to break the FPC flexible tape.


Después de este paso retiramos la pantalla LCD.

 After this step we remove the LCD.


Y lo que vemos es esto.

 And what we see is this.


 El siguiente paso es para el dispositivo lector/grabador de la tarjeta SD.

The next step is for the SD card device.


Y siguiendo con el proceso de acceso al sensor vemos las siguientes imágenes.

And continuing with the process of accessing the sensor see the following pictures.


Modulo de la batería.

 Battery Module.


Módulo separado a falta de extraer el conector.

 Separate module failing unplugging.


Chasis frontal.

Front chassis.


 Módulo del flash.

 Flash module.


El sensor que debemos extraer.

The sensor to be learned.


Y por fin el sensor.

And finally the sensor.


Despiece completo de la cámara lista para ser montada.
Los tornillos están aparte y perfectamente clasificados y ordenados.

Complete detailing of the camera ready to be mounted.
The screws are separate and clearly labeled and sorted
.


lunes, 26 de marzo de 2012

NIKON D70s flash averiado y reparado

CÓMO REPARAR EL FLASH DE LA CÁMARA NIKON D70

HOW TO REPAIR THE CAMERA FLASH NIKON D70

El problema que presentaba esta cámara era que cuando el flash se abría, no se disparaba.
Se oía el sonido del resorte que lo libera, cada vez que se pulsaba el disparador pero, ni el obturador funcionaba ni el flash hacía su disparo de luz.
En la siguiente imagen se ve el gancho de plástico que sujeta el flash pegado sobre el pentaprisma y que, cuando intentamos hacer una fotografía con el flash, el citado gancho se desplaza hacia el frente de la cámara un par de milímetros para liberarlo y así dispararse.

The problem I had this camera was that when the flash is opened, not fired.

There was the sound of the spring that releases every time you pressed the shutter but neither the working shutter and flash light.

In the next picture is the plastic clip that holds the flash stuck on the pentaprism and when trying to do a picture with the flash, said hook moves to the front of the camera a couple of millimeters to release it and shoot the light.


Con el flash abierto y la cámara apagada la ponemos sobre la mesa sobre su parte trasera y dejando a la vista los tornillos que sujetan la tapa superior del flash para proceder a retirarlos teniendo MUCHO CUIDADO de no ejercer demasiada presión ya que romperíamos las bisagras del flash dejándolo inutilizado.

En la siguiente imagen se ven marcados con las letras A y B los dos tornillos que retiraremos.

With the flash open and the camera off put it on the table on its back and exposing the screws that secure the top cover to proceed to remove flash taking CAREFUL not to put too much pressure as it would break the hinges Flash leaving it unusable.

In the next image are marked with the letters A and B
the two screws I will remove. 


Una vez que hemos retirado los tornillos (los dejamos a buen recaudo) y pasamos a realizar una de las tareas complicadas, desbloquear las dos pestañas metálicas que mantienen sujeta la carcasa del flash. En la imagen siguiente, marcado como C y D están los dos agujeros donde se encuentran las citadas pestañas y, con un destornillador de punta muy fina, desplazamos hacia abajo, primero una de las lenguetas (haciendo un poco de presión con un dedo hacia atrás en la carcasa por el mismo lado) y después en la otra pestaña y con la misma maniobra. Hay que insistir hasta conseguirlo pero sin hacer fuerza excesiva ni forzar nada mas allá de lo razonable.

 Once you've removed the screws (the left in a safe) and had to perform a difficult task, unlock the two metal tabs that keep holding the flash housing. In the picture below, marked as C and D are the two holes where the tabs above, and with a very fine tip screwdriver, scroll down, first one of the tabs (doing a little pressure with a finger back on the housing on the same side) and then the other tab and the same maneuver. We must insist to get it but without excessive force or force anything beyond reason.


Vemos como se separa la carcasa superior.

See as the upper housing is removed.


Ya tenemos la tapa fuera de su lugar.

We have the cap out of place


Y aquí vemos el origen de la avería.
Ese pequeño trozo de plástico blanco que está marcado con una flacha roja se a partido y no desplaza el contacto eléctrico que permite al flash cargarse de energía para su posterior disparo.
La flecha verde nos indica hasta donde debería llegar ese trozo de plástico blanco.

And here we see the origin of the fault.

That little piece of white plastic that is marked with a red arrow
is split and don't move left and no electrical contact that allows the flash charging power for later shot.

The green arrow indicates up to where it should get that piece of white plastic.


Otra vista de la avería.

Another view of the fault.


Cogemos un pequeño trozo de tubo de aislamiento que tenga un diámetro interior igual al diámetro del trozo visible del plástico que se ha roto.
Lo untamos con una gota de Super Glue o cualquier pegamento rápido.
Con una pinza de punta muy fina lo metemos de manera que sirva de prolongación a la varilla de plástico original.

We take a small piece of insulating tube having an inner diameter equal to the diameter of the plastic visible piece is broken.

The spread with a drop of Super Glue.

With a very fine needle nose pliers so that we put extension serve the original plastic rod.


Lo dejamos secar durante unos minutos y lo cortamos a la medida que se aprecia en la imagen.

I let it dry for a few minutes and cut to the extent shown in the image.


En las siguientes imagenes vemos como queda el suplemento añadido una vez que se ha cortado.
Hay que procurar que no sobresalga mas de lo necesario para mover la lengueta del interruptor.

In the following images we see as the supplement is added once it has been cut.
Ensuring that it does not protrude more than necessary to move the switch tab.


Sólo nos queda reponer la tapa del flash siguiendo el proceso inverso que ya vimos para desmontarla.
Conviene probar su funcionamiento antes de poner la tapa para asegurarnos que no falla.

We can only replace the flash cover the reverse process that we saw to remove.

Should test it before putting the lid to make sure it does not fail.


Translated with the help of Google translator